This chapter describes the basic mechanism behind the creation of resizable user interface elements in FLTK.
FLTK uses a simple, but very versatile system to resize even the most complex dialogs and interfaces. The resizing is implemented within the Fl_Group widget, and the exact resizing behavior of that group is determined by its resizable() attribute.
Resizing can be disabled
The resizable may be set to zero, which means that the group will not resize. Note that this is the default behavior for Fl_Window and Fl_Pack derived widgets, and therefore the programmer must explicitly set the window's resizable attribute if they want to allow the window to be resized.
Resizing can be simple
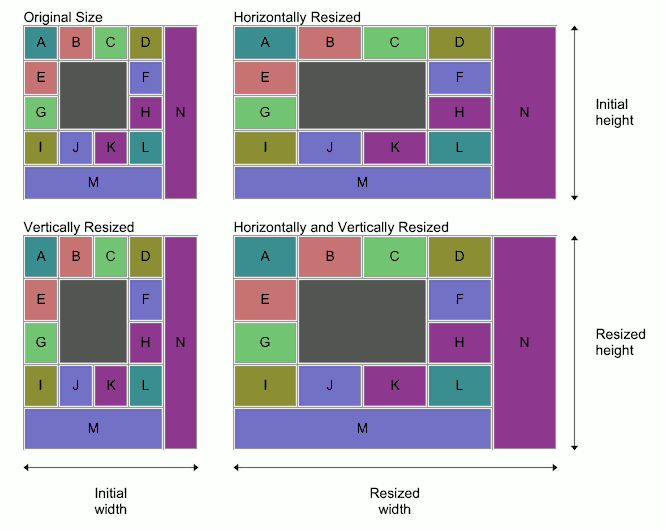
The resizable may be set to the group itself, which means that all widgets within the group will resize as the group itself is resized. This is the default behavior for Fl_Group widgets, and is shown in the diagram below.
If the group is stretched horizontally, the widths of the widgets within the group are adjusted proportionally. The same is true for vertical resizing.
Resizing can be complex
It is when the group's resizable attribute is set to one of the group's child widgets, that things become really interesting.
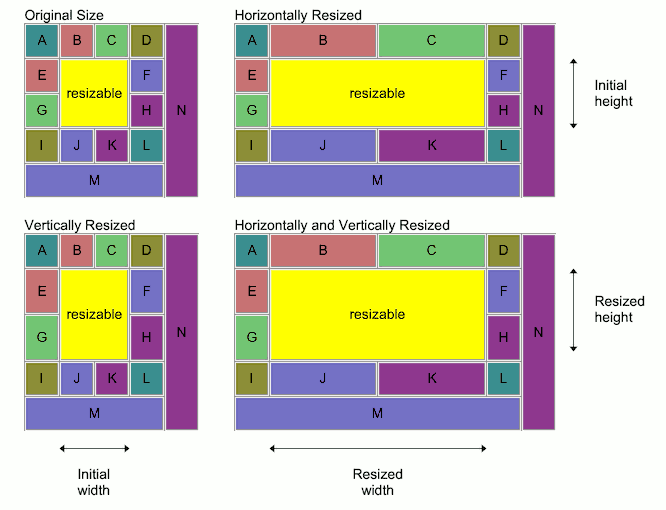
In the diagram below, imagine vertical lines extending from the left and right sides of the yellow widget marked "resizable", and horizontal lines extending from the top and bottom sides. Exactly which widgets resize, and by how much, is determined by which ones lie completely or partially within this cross.
The widgets marked B, C, J, K and M clearly lie completely or partially within the vertical part of the cross; the widgets marked E, F, G, H and N lie completely or partially within the horizontal part of the cross; and the widgets marked A, D, I and L do not overlap with the cross at all. The resizing behavior is as follows:
- the width and height of the
resizablewidget increase to match the change in the width and height of the group widget as it is stretched;
- the widths of those widgets that overlap with the vertical part of the cross increase proportionally as the width of the group widget increases, but their heights remain unchanged, i.e. the widgets marked B, C, J, K and M;
- the heights of those widgets that overlap with the horizontal part of the cross increase proportionally as the height of the group widget increases, but their widths remain unchanged, i.e. the widgets marked E, F, G, H and N;
- the widths and heights of the remaining widgets stay the same, i.e. the widgets marked A, D, I and L stay the same size.
Practical examples
Why is this so powerful, you may ask. Well, every widget group can have a completely independent resizing strategy. By replacing one or more of the group's "normal" child widgets with another group widget where all of the above rules can be applied again, it is possible to create a hierarchy of group widgets with very complex layouts and resizing behavior.
Consider a simple dialog box, consisting of an icon box and a message area on the top and a button at the bottom right: which widget should be the resizable one?
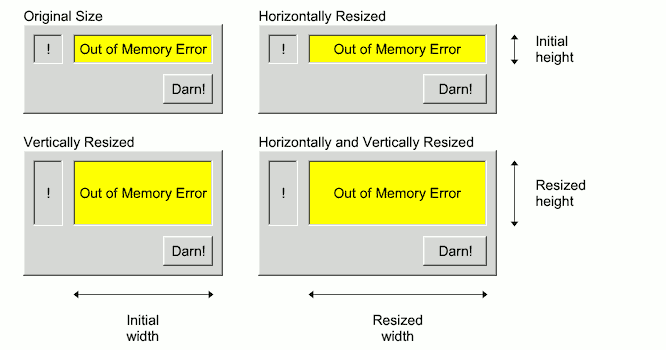
Setting the resizable to be the icon box won't give us what we want:
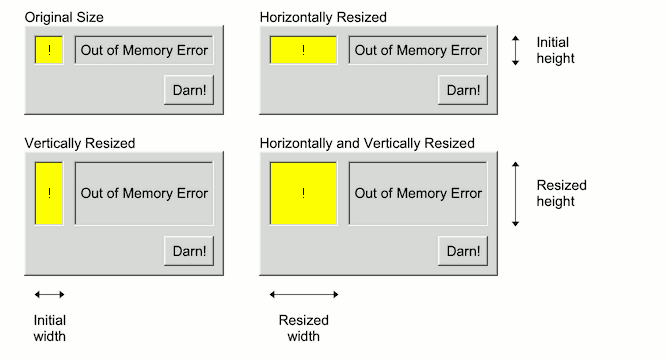
The message text area would be the logical choice so that the user can expand the dialog to see if there is more of an explanation below the short error message. This results in the behaviour shown in the diagram below.
The result is close to what we want, but not quite: the text area will fully resize, the "!" icon box will resize vertically but not horizontally, which we can live with, but the "Darn!" button will - wait a minute - resize horizontally?
That's ugly. How do we stop that from happening? Simple: put it in its own group and set the resizable to an invisible box widget, as shown in the diagram below.

Now the invisible box, shown as "R", takes all of the horizontal resizing and the "Darn!" box will stay as it is. Here's the skeleton code:
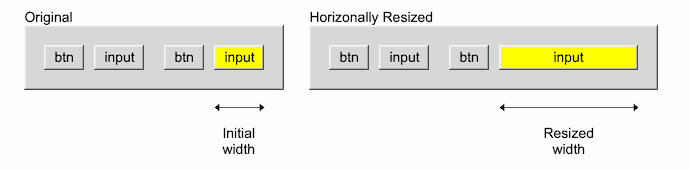
Imagine instead that you have a group that has a button, an input field, another button and a second input field, all next to each other, and you want the input fields to resize equally, but not the buttons. How could you achieve this?
Setting either of the input fields to be the resizable leaves the other one fixed, as shown below:
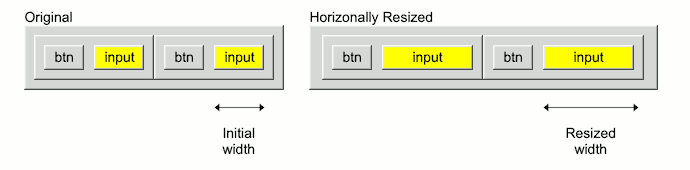
The answer is to leave the resizable of the group set to itself, and to create two equal size subgroups, each of which will resize equally. Add a button and input field to each subgroup, and set each subgroup's resizable to the input field, as shown below. Tada!
In FLTK it is possible to solve almost any layout and resizing problem by introducing an invisible box into a group, or an extra group into the widget hierarchy. It might take some thought to achieve exactly what you want and sometimes it is necessary to introduce parallel hierarchies in order to get widgets in different groups to resize together.
| [Prev] Common Widgets and Attributes | [Index] | Designing a Simple Text Editor [Next] |
